
Side Dishes
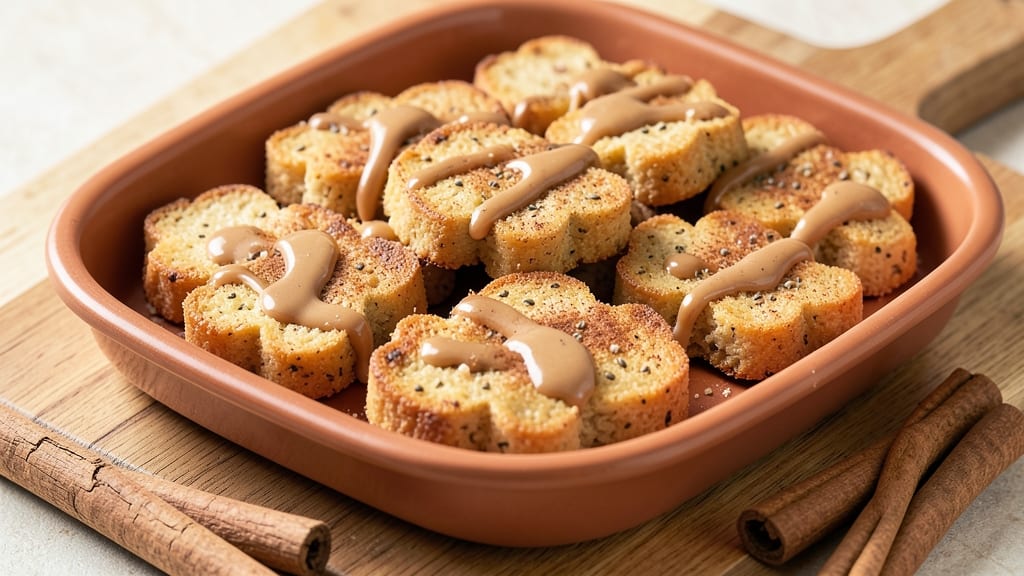
This baked sweet potato dog treats recipe delivers crunchy, vitamin-packed rewards your pup will love—no artificial ingredients in sight. 💛 Sweet potatoes provide natural sweetness and fiber, while a touch of peanut butter adds irresistible flavor.
My version skips the processed fillers, using only wholesome ingredients your dog can safely enjoy.
The secret to perfect texture lies in baking at 350°F until golden and crispy, not mushy. These treats are naturally vegetarian, making them ideal for plant-based pet diets, and they store well for up to two weeks.
The recipe yields about 24 bite-sized treats, perfect for training sessions or as a special snack.
What makes these treats stand out is their hidden nutrition—packed with beta-carotene and fiber from the sweet potatoes, plus protein from the peanut butter. Your dog will get a tasty reward while you enjoy the peace of mind that comes with homemade, vet-approved goodies.
Whether you're rewarding good behavior or just spoiling your furry friend, these treats are a simple way to show love without compromise. Let's get baking—your pup will thank you!
Ingredients for baked sweet potato dog treats
Sweet potatoes and wholesome ingredients make these vet-approved treats irresistible to pups.
| Ingredient | Amount | Notes |
|---|---|---|
| Organic Sweet Potatoes 🍠 | 2 lbs | Peeled and grated fine |
| Natural Peanut Butter 🥜 | ½ cup | Xylitol-free, unsweetened |
| Coconut Oil 🥥 | ¼ cup | Melted for binding |
| Whole Wheat Flour 🌾 | 1 cup | For texture and binding |
| Ground Flaxseed 🌿 | ¼ cup | For omega-3 boost |
| Cinnamon 🌶️ | 1 tsp | Pure, no additives |
| Turmeric Powder 🌿 | ½ tsp | For color and antioxidants |
| Unsweetened Applesauce 🍎 | ¼ cup | For moisture and sweetness |
| Pure Maple Syrup 🍁 | 1 tbsp | For natural sweetness |
| Water 💧 | ¼ cup | For dough consistency |
Sweet potatoes are the star here—organic is best to avoid pesticides, but regular works too. Trader Joe's and Whole Foods carry great organic options, but any sweet potato will do if it's firm and free from soft spots. The key is grating them fine (a box grater works best) so they blend smoothly into the dough. For extra nutrition, I always add a touch of turmeric—it's anti-inflammatory and gives the treats a vibrant color. If you can't find organic, just peel them thoroughly to remove any surface contaminants.
No peanut butter with xylitol? SunButter or natural almond butter are great alternatives—just check the label. Running low on coconut oil? Avocado oil or melted vegan butter keeps the recipe vegan. The flaxseed is non-negotiable for that omega-3 boost, but if you're out, chia seeds at the same amount work too. For sweetness, maple syrup is ideal, but unsweetened applesauce alone can handle it if you skip the syrup. The dough should hold together but not be sticky—add a splash more water if needed.
These treats keep for 2 weeks in an airtight container at room temperature, or 3 months in the freezer. I portion mine into single-serving bags before baking so they're ready for training sessions. For extra crunch, bake them a few minutes longer until they're firm to the touch. Store leftovers in the fridge for up to 1 week—just let them sit at room temp for 10 minutes before serving. Perfect for rewarding good behavior or just spoiling your pup!
Why You'll Love This Recipe
- No-Fuss Mixing: I swear by these treats because they’re three ingredients max after the dough comes together—just mash the sweet potato, stir in peanut butter and coconut oil, then fold in the flour. No weird ratios to eyeball, no waiting for dough to rise. Honestly, my lazy Sundays just got an upgrade.
- Peanut Butter Magic: That creamy, nutty peanut butter isn’t just filling—it’s the star. The sweet potato gives it a natural caramel depth, while the flaxseed adds a subtle earthy crunch. My dog goes wild for it, and I’ll admit, I’ve been known to sneak a bite (or three) straight from the batch.
- Freezer-Friendly Staple: Between us, these treats are my secret weapon for busy weeks. Bake a big tray, portion them into containers, and they’ll last months in the freezer. Toss one in your purse for car rides, or grab a handful when guests drop by—no one suspects how little effort they take.
- Budget Booster: Sweet potatoes are dirt cheap, and whole wheat flour stretches further than you’d think. I make a double batch for $3, and the leftovers fund my coffee habit for days. Plus, the flaxseed adds fiber, so I’m basically feeding my pup and saving money—win-win.
Step-by-step instructions for baked sweet potato dog treats
Here's how to make crunchy, healthy treats your pup will love—packed with veggies and protein.
👨🍳 Step 1: Prep and Mix the Sweet Potato Base
Preheat your oven to 350°F and line two baking sheets with parchment paper. In a large mixing bowl, combine the 2 lbs of peeled and finely grated organic sweet potatoes with the 0.25 cup of melted coconut oil. The grated sweet potatoes should look like fine, wet sand—this texture is crucial for even baking.
Add the 0.5 cup of natural peanut butter and mix until fully incorporated. The peanut butter will help bind the ingredients and add that irresistible flavor dogs can't resist. Stir in the 0.25 cup of unsweetened applesauce and 1 tbsp of pure maple syrup—these ingredients add moisture and natural sweetness without overpowering the sweet potato flavor.
👨🍳 Step 2: Combine Dry Ingredients for Perfect Texture
In a separate bowl, whisk together the 1 cup of whole wheat flour, 0.25 cup of ground flaxseed, 1 tsp of cinnamon, and 0.5 tsp of turmeric powder. The turmeric gives the treats a beautiful golden color and adds anti-inflammatory benefits, while the flaxseed boosts omega-3 fatty acids for your pup's coat and joints.
Gradually add the dry ingredients to the sweet potato mixture, stirring constantly. The dough will become thick and sticky—this is normal. If it seems too dry, add the 0.25 cup of water 1 tablespoon at a time until you achieve a workable consistency. You're aiming for a dough that holds together when pressed but isn't so wet that it won't bake properly.
🍳 Step 3: Roll and Cut for Uniform Treats
Lightly flour a clean surface and turn out the dough. Roll it to about ¼-inch thickness—this ensures even baking and a perfect crunch. I like to use a rolling pin, but if the dough sticks, wet your hands slightly and press it gently. The treats should be about 2-3 inches in diameter for perfect bite-sized portions.
Use a round cookie cutter or a glass to cut out the treats. If you don't have a cutter, a knife works too—just dip it in flour between cuts to prevent sticking. Place each treat on the prepared baking sheets, leaving about 1 inch between them. This spacing prevents burning and allows for even browning.
🔥 Step 4: Bake to Crispy Perfection
Bake the treats for 25-30 minutes, switching the baking sheets halfway through for even cooking. They're done when the edges are golden brown and the centers feel firm to the touch. The treats should have a slight crispness but still be soft enough for your dog to enjoy.
Let them cool completely on the baking sheets before transferring to an airtight container. This cooling process is crucial—it allows the treats to set properly and prevents them from becoming soggy. Store in the fridge for up to 2 weeks or freeze for up to 3 months for maximum freshness.
🐕 Step 5: Serve and Store for Happy Pup Treats
Once cooled, your pup will be eagerly waiting for these crunchy, veggie-packed treats! Each treat contains about 10-12 calories and is packed with natural sweetness, fiber, and essential nutrients. The combination of sweet potato, peanut butter, and flaxseed makes these treats both delicious and beneficial for your dog's health.
For extra storage, place the cooled treats in a single layer on a baking sheet and freeze for 1 hour before transferring to a freezer bag. This prevents them from sticking together. Serve as rewards, training treats, or just because your pup deserves a little something special!
Pro Tips For Making Baked Sweet Potato Dog Treats
- Prep Potatoes Right: DESCRIPTION: Peel and chop sweet potatoes into even ½-inch slices—thicker pieces stay gummy, thinner ones burn before baking. I learned this the hard way after pulling out a batch that looked like rubber.
- Mix Flaxseed First: DESCRIPTION: Combine ground flaxseed with 3 tablespoons water and let it thicken for 5 minutes before adding to the dough. This mimics an egg binder and keeps treats from crumbling—no last-minute scrambling.
- Bake at 325°F: DESCRIPTION: Skip the 350°F temptation—325°F ensures even cooking without drying out the edges. After burning my first batch at high heat, I now bake for 25–30 minutes, flipping once at 20 minutes.
- Chill Before Cutting: DESCRIPTION: Let the dough rest 30 minutes in the fridge before shaping. This prevents peanut butter from oozing out during baking and makes rolling easier—yes, even if you’re impatient like me.
Troubleshooting this recipe
Dough Too Sticky?
If your dough feels too wet and won't hold together, add 1 tablespoon of whole wheat flour at a time until it reaches a workable consistency. I’ve found that 1-2 extra tablespoons usually does the trick.
The dough should hold its shape when pressed but still be pliable enough to roll out. Overmixing can make it tough, so just stir until combined. 🥄
Treats Turning Mushy
Mushy treats usually mean the dough was too wet or the oven temperature wasn’t consistent. First, ensure your oven is fully preheated to 350°F—use an oven thermometer to confirm accuracy. If the treats still turn out soft, reduce the baking time by 2-3 minutes and check for doneness earlier.
Let them cool completely before storing, as residual heat can cause sogginess. ❄️
Uneven Baking
If your treats bake unevenly, switch the baking sheets halfway through the 25-30 minute bake time. This ensures even heat distribution. Also, make sure your oven racks are positioned in the middle—avoid the top rack, which can cause browning too quickly.
For extra insurance, use parchment paper on both baking sheets to prevent sticking and promote even cooking. 🔥
Peanut Butter Separating
Natural peanut butter often separates, but this is easy to fix. Simply stir it vigorously with a fork before adding it to the dough. If it’s too thick, warm it gently in the microwave for 10-15 seconds to restore its smooth texture.
Avoid brands with added oils or sweeteners—they can alter the consistency of your treats. Stick to 100% natural peanut butter for the best results. 🥜
Dough Sticking to Surface
If the dough sticks to your rolling surface, lightly dust it with whole wheat flour or use a silicone mat. For stubborn sticking, wet your hands slightly before handling the dough—this prevents it from tearing.
If the dough is too dry, add 1 teaspoon of water at a time until it becomes pliable again. A damp cloth can also help if the dough clings to the counter. 🧤
Storage Issues
If your treats lose crunch after storage, they likely absorbed moisture. Store them in an airtight container with a silica gel packet to absorb excess humidity. For extra crispiness, reheat treats in the oven at 200°F for 5 minutes before serving.
Avoid storing them in the fridge longer than 2 weeks—freezing extends their shelf life to 3 months while preserving texture. 💫
Nutrition facts
Frequently asked questions
Can I make these treats without peanut butter?
Replace the 0.5 cup of peanut butter with 0.5 cup of natural almond butter or SunButter (sunflower seed butter)—just ensure it's xylitol-free. For a vegan option, use 0.25 cup of mashed banana or 0.25 cup of unsweetened applesauce instead. The dough may need 1 extra tablespoon of water to bind properly.
How do I adjust the recipe for a larger batch?
Double all ingredients for about 48 treats. Use 4 lbs of sweet potatoes, 1 cup of peanut butter, and 2 cups of flour. Bake on three parchment-lined sheets, rotating pans halfway through the 25-30 minute bake. Store extras in airtight containers or freeze in portions.
Are these treats safe for puppies?
Yes, but with caution! Puppies under 4 months should only have 1-2 tiny pieces due to their small size. Avoid giving treats with added spices like cinnamon or turmeric to very young pups. Always introduce new foods gradually and monitor for allergies. Sweet potatoes are safe in moderation for all life stages.
Why do my treats taste bitter?
Bitter flavor usually comes from overbaking or using expired ingredients. Check your oven temperature—it should be 350°F (use an oven thermometer). Also verify that your peanut butter and sweet potatoes are fresh. For extra flavor, add 1 teaspoon of honey (if your dog can have it) or 0.25 cup of pumpkin puree to the dough.
Can I add other vegetables to these treats?
Yes! Finely grate 0.5 cup of zucchini or 0.25 cup of carrot and mix it into the dough. For extra nutrition, add 1 tablespoon of ground chia seeds or 0.25 cup of cooked quinoa. Just ensure all veggies are dog-safe (no onions, garlic, or mushrooms). Steam or boil veggies first to remove excess moisture.